Wednesday, April 1, 2009
SEO and Link Building

Not All Links Are Created Equal:
Every website or blog owners want their site to rank high in search engines and a very popular way of doing this is by building links. But you need to know that not all links are created equal.
Many links are more valuable for your site rankings than others, and certain types of links can even pull your website’s rankings down. So to make sure we are getting those valuable links we need to know more about the links we are getting.
Inbound | Outbound Links
When it comes to links there are a few different types, some which you may be aware of and others to which you probably have not given a lot of consideration. So, before we start talking about the types of links you want and the ones you don’t, let's dig deeper into our links.
Outbound links
Outbound links are links that you have on your site which lead to other sites. For example, if you were writing about directories and you linked to the directory site so your readers can access the directory or get more detailed information about it, that would be an outbound link from your site.
Inbound links
An inbound link is a link to your site from another site. To give you an idea, if you have a friend who has a site of their own, and they find a useful article or page on your site and link to it, this is an inbound link.
General links
A general link is a link to your main home page or your site's index page.
Specific links
This is generally a link to a specific section or posting on your site. For example, if you run a blog and someone links to the URL of a specific blog posting, in order to use your site as an example, reference or to provide information, then they have given you a specific link to your site. It should be noted, of course, that both general and specific links can be either inbound or outbound.
Low ranking versus high ranking sites
It is important to know that not all sites worry about the places where your inbound links come from, but some do. Just to be fair.
*Low ranking sites - This are sites that has linked to you but does not have a high traffic flow. This will be the bulk of sites.
*High ranking sites - These are sites with generally high traffic flow, and high rankings in search engines. These sites are usually also very well known.
Each of the search engines has an algorithm that determines how a site will be ranked. It is important to know that there are two main types of algorithms: those that count your inbound links and those that do not.
The theory behind the ones that do count your inbound links is that these links shows your popularity, and therefore your relevance to readers. The non-inbound links counters have the philosophy that, as a site administrator, you have no control over who, if anyone, can link to your site, and you should not be penalized for that.
Link Building No NO!
*Hire a link building service. At first, this seems like it would be a great idea; after all, you are guaranteed links to your site. But you should know that most search engines have a method in place to recognize when a site is link spamming, which is what these services are actually offering you. When you turn the work over to a third party, you lose control of the situation, and that is a problem because you are unable to control the quality and relevance of the links to your site.
*Doing it Yourself. Build links with every site you can get to agree or make a comment on. Well, this idea is great. You have the ability to exercise control, but you just aren’t doing it. Before you go off half-cocked you should think about why we practice SEO in the first place. We do it because higher rankings draw in readers, which brings in advertisers and revenue. Linking to or from an irrelevant site will not help you in the long run, and may even cause search engines to mark you off as surely as if you had paid a service.
Doing It the Right Way
Build your links wisely; worry about the long term and not immediate results. The path to doing this is surprisingly straightforward.
First make two lists. The first list should be of sites that you can build links to by yourself. The first list will include blogs in which you can post comments (and links), and the second will be sites with which you want to build a linking relationship in the content that the site publishes. Now choose your top 10 from each list.
On your self link building list, be sure that your comments or postings are not spam-like in nature; be relevant and thoughtful. For your second list, get the contact information and send polite and professional emails suggesting a shared linking arrangement. You have to be able to give as well as take here.
Build your self posted links slowly, focusing on one or two comments a day over a few weeks or months. For the second list, once you have sent out the emails, all you can do is wait. After a few weeks have gone by you can move on down your list to the next 10. Just be sure to honor your prior agreements or you may find yourself with angry link partners on your hands.
Read more... 2 comments 11:52 PM Posted by Admin
Labels: search engine optimization
Wednesday, March 11, 2009
Using GIF and JPEG graphic images in web site design
What is Gif's?
(Graphics Interchange Format)
GIF file can contain the maximum of 256 colors (8 bit) or less, which is good for customizing your graphic files. For example, if you create a GIF image of a red arrow, , you can customize the file to have only two colors, read and white. This means that the file is very very small because its palette contains only two colors. GIF file will yield a higher quality and smaller size image, compared to JPEG, when it is used with computer generated graphics such as icons, logos, buttons, etc.
Example: GIF Format

What is JPEG's?(Joint Photographic Experts Group)
JPEG was built to contain 24-bit (16.7+ million colors) and was developed specifically for photographic-style images. JPEG stores the information of images by keeping track of color changes. The advantage of JPEG is that it can carry a smaller file size than GIF when used in storing photographs and images with a wide variety of shading. But, it will not yield a smaller file when dealing with low color level and details like computer generated graphics.
Example: JPEG Format
GIFs also has some special features such as animation, transparency, and interlacing.
Format GIF
1) Logo
2) Button
3) Animated GIF
4) Transparent
5) Icon
Format JPEG
1) Photos
2) Picture
3) Potret
Read more... 1 comments 10:59 AM Posted by Admin
Labels: Adobe Photoshop, How To
Fill Text with Images in Photoshop
Open a landscape photo with definite color. Avoid something with too much of one solid color in one area, or with the same color as the background of the page you'll eventually be placing the word on. The image below (© iStockphoto.com ) is a good candidate for this technique.

Step 2
Select Photoshop's Text tool and click somewhere in the photo. This will create a new text layer. Type in the text you want the image to show through. If necessary, change the font size to something larger by either selecting the text and changing the size on the Options palette, or by clicking-and-dragging a corner of the text with the Move tool. (Make sure Show Transform Controls is selected up in the Options palette). For manual resizing, hold Shift to maintain proportion, and press Enter to apply changes.

Step 3
Change the typeface to a strong, thick font. I chose Impact.

Step 4
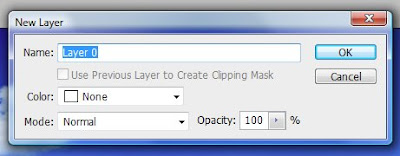
Next, double-click the Background layer to convert it to a normal layer. Name it something -- I've called mine Layer 0 -- and press OK.
Step 5
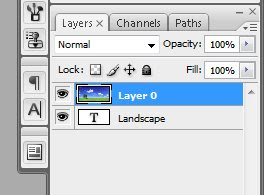
In the Layers palette, click-and-drag Layer 0 above the text layer.
Step 6
Now click on Landscape layer then (ctrl + right click) on mouse, u can see selected the text. Then click on layer O choose Select-> Inverse (Shift+ Ctrl +I) after that click delete from keyboard.
Your text should now contain the pixels of the photo, but the shape of the text.
Step 7
Select the Move tool and click-and-drag the text layer around the canvas. This lets you place the text so that the best part of the photo shows through.
Step 8
If you save the file as a JPEG, Photoshop adds a white background. To preserve the transparency, save the file as a transparent GIF. To preview what a background will look like with the text, click Add New Layer on the Layers palette, and click-and-drag the new layer to the bottom. Then, click the Foreground color and select a color for the background, such as white. Press Option-Delete (PC: Alt-Backspace) to fill that layer with the color.
Step 9
Let's try something slightly different example. For this example, I've used an image by David Freund, © iStockphoto.com.
Step 10
Now you'll add three text layers separately. Select Photoshop's Text tool, click in the photo, and enter the word "Ocean." Resize the text as desired.
Option-Click (PC: Alt-Click) to duplicate the text and then select the Text tool to change the text to "Surf". Option/Alt-Click again to change the text to "Sea". Position the words as you see below, then select all the text layers in the Layers palette and go to Layer > Merge Layers (or press Cmd-E (PC: Ctrl-E).
Step 11
Double-click the photo layer to make it a normal layer. Click-and-drag the merged text layer below the photo layer. Option-Click (Alt-Click) with the cursor in between the two layers. Add a white layer as you see below, or keep the background transparent.
Read more... 0 comments 4:14 AM Posted by Admin
Labels: Adobe Photoshop, How To
Wednesday, March 4, 2009
Trees Promo Brush Pack
 Hi again, today i want to shared photoshop brush with you all, this brush create by Horhew. I tell you what, this brushes are FREE to use.
 Infor The Brush
Extreme-quality (average resolution 2000+ pixels) tree brushes for Photoshop 7 and higher. Offering these brushes for free download.
Oh yea, one more thing offering these brushes for sale is strictly forbidden!
This brushes you can use for create Website Design also Advertisement and so on. You like it!
CLICK READ MORE FOR DOWNLOAD
Trees Promo Brush Pack
Read more... 0 comments 10:40 PM Posted by Admin
Labels: Photoshop Brushes
Free Vector Art - Envelope Icon Set
PLEASE CLICK READ MORE FOR DOWNLOAD
Download Free Vector Art - Envelope Icon Set
Download Terms
All free artwork downloads are copyright of respective owners.
Please DO NOT
You many not alter the source files or use the original sources files in order to make money by selling them.
You may not claim any of the files as your own.
You may not upload these files to any stock illustration/photo/resource sites.
Please do not copy our entire post and paste it on your site. You can use quotes or excerpts, but make your post original. Besides copying posts is considered duplicate content by search engines and will eventually hurt your rankings!
Please DO
Feel free to use these images in any of your designs such as in posters, flyers and business cards.
Feel free to use a screen shot or an image from our site to link back to us, please do not hot link our images.
* By downloading and or using the files you agree to these terms and conditions. Violating these terms and conditions could result in punishment to the maximum extent of the law. Terms and conditions are subject to change without notice.
Read more... 0 comments 7:42 PM Posted by Admin
Labels: Graphics


